
RV Repair and Upgrade Guide: Installing a Powered Roof Vent Fan
Do you feel like your RV lacks proper airflow and ventilation? Does the interior get stuffy and humid during summer trips? Installing a powered roof vent can make a huge difference in comfort!

In this DIY guide, we’ll walk you step-by-step through adding a 12-volt DC-powered vent to your RV. We’ll cover how to choose the right vent, calculate power requirements, pick the optimal mounting location, and safely install it on your roof.
By the end, you’ll have the knowledge to upgrade your RV with a powered vent on your own. Or we’ll explain when it makes sense to bring in a professional RV service technician for assistance. Let’s get started!
What is a Powered Roof Vent?
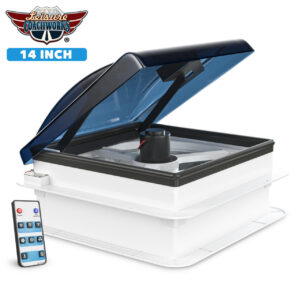
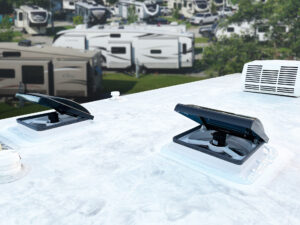
A powered roof vent for RV is a ventilator installed on the roof of an RV that uses an electric fan to actively circulate air. It pulls stale, humid air out of the interior while drawing fresh air in.
The main components of an RV powered roof vent are a plastic or metal dome lid on the exterior roof, a mounting base that attaches to the roof framing, and an electric fan inside the vent housing. Most run on the RV’s 12-volt DC electrical system.
Unlike a passive roof vent that relies solely on natural airflow, the fan in a powered vent creates active air movement. This makes a powered vent much more effective at regulating temperature, reducing humidity, and quickly venting odors and fumes.
Benefits of a Powered Vent
Installing an RV powered roof vent offers many benefits over a standard passive vent:
- Allows active air circulation: Rather than just passive airflow, the fan creates strong suction to pull air through the RV.
- Significantly improves airflow and ventilation: A powered fan circulates 5-10 times more air than a passive vent.
- Provides better temperature regulation on hot days: The improved airflow cools the interior faster than AC alone.
- Reduces humidity buildup and eliminates musty smells: The constant air exchange keeps condensation in check.
- Quickly removes odors and fumes: Gets rid of the smells from cooking or the bathroom faster than they can linger.
- Can reduce your need to run the AC: The improved ventilation may decrease AC runtime on mild days.
Overall, a powered roof vent keeps the interior feeling fresh, dry, and comfortable in any weather!
Choosing the Right Powered Vent
The first step in any DIY project is planning. When upgrading your RV with a powered roof vent, you have two options – either replacing an existing passive vent with a powered one or installing a brand new vent in a location that doesn’t currently have one. Regardless, there are a few key factors to consider when selecting the right powered vent.
Determine the Best Mounting Location

When choosing where to install your powered roof vent, consider existing roof fixtures like air conditioners, antennas, or solar panels. There should be adequate clearance around the vent so it can open fully and air can circulate.
Inspect the roof surface where you plan to install the vent. Avoid ribs, supports, or irregular contours. The base of the vent needs a flat surface.
Also, check for obstructions inside the ceiling, like beams or wiring. Use a roof vent specifically made for angled roofs if needed.
Determine the room below, like the kitchen, bathroom, or bedroom. Doing so can help select the best ventilation location.
Check Your Roof Vent Opening Size
If replacing an existing roof vent, you’ll need to measure the rough opening where it was installed. Start by removing the existing cover and any sealant around the edges. Then, it’s as simple as using a tape measure to accurately measure the opening length and width.
This ensures you get a replacement powered vent base that fits properly within the existing cutout. For new RV powered roof vent installations, 14″ x 14″ is the standard size to cut between roof joists or rafters. The powered vent kit you purchase should include a template for tracing the outline on the roof.
Taking careful measurements is crucial so your powered vent base drops right in and seats flush on the roof.
Calculate Electrical Requirements
One benefit of powered roof vents is that they run directly off your RV’s 12-volt DC electrical system. That means no inverter is required. However, the motor will draw additional amps, so you need to make sure your RV battery and converter can handle the extra load.
For a single vent, the standard 120W motor will draw around 10-15 amps at high speed, which is usually no problem for most RV electrical systems. If installing multiple vents or a high-powered fan, calculate the total amp draw. Compare this to your RV’s converter size to ensure adequate power.
You can always upgrade to a larger converter if needed to provide enough juice. The good news is that powered vents don’t require a ton of electricity to run efficiently. Just be sure to factor in the added amperage draw.
Compare Vent Features
There are a few variations when selecting a powered roof vent model:
- CFM Rating: The higher the cubic feet per minute (CFM), the more air exchange. Choose a CFM rating based on your RV’s size.
- Directional Fans: Some vent fans have louvers that allow you to direct the airflow. It helps channel the air where you need it.
- Remote Control: Higher-end models may include a remote control to operate the fan speed and dome opening. That allows you to adjust from anywhere inside.
- Rain Shield: Some vents integrate a rain shield or bug screen to protect the unit when open.
- Automatic Mode: This uses a thermal sensor to automatically turn the fan on/off as needed. Set your ideal temperature threshold.
Also consider noise level, listed warranty, motor type, etc., to choose the right powered vent model for your RV.
How to Install a Powered Roof Vent
Now that you’ve selected the perfect powered vent model, it’s time for the RV powered roof vent installation. It is definitely a challenging DIY project but entirely doable if you’re reasonably handy.
You’ll need the following supplies to install your powered roof vent:
- The vent assembly kit with dome lid, fan, trim ring, screws, etc.
- Butyl tape and non-drying sealant like Dicor for waterproofing
- Caulk gun, drill, saw, driver bits, and other installation tools
- Gloves, knee pads, safety glasses, and other protective gear
Alright! Let’s go through the roof vent installation process step-by-step:
1. Prepare the Installation Area
To get the roof ready for the new powered vent, start by thoroughly inspecting the interior ceiling for any obstructions like beams or wiring that could get in the way. It is an important step for all vent installations.
If you’re replacing an existing vent, remove the old vent assembly completely using a putty knife to break the sealant bond. Scrape off all old sealant and debris around the opening to provide a clean mounting surface.
For brand-new vent installations, use the provided template to trace the outline of the opening on the roof in your desired location. Make sure the location has adequate clearance around it. Then, use a circular saw adjusted to the proper depth to cut through the roof along the outline. Cut an accompanying frame in the ceiling to match the vent base dimensions.
Taking the time to properly prepare the installation area ensures the vent base can seat securely on the roof surface for optimal weatherproofing
2. Mount the New Vent Assembly
Once the roof opening is prepped, it’s time to mount the new powered vent.
- First, you’ll need to apply butyl tape around the perimeter of the vent base to create a seal between it and the roof.
- Then, insert the vent pipe through the opening and make sure the base is properly aligned and seated flat on the roof. If powered, connect the positive and negative wires to the vent motor according to the diagram.
- Finally, attach the trim ring to the interior ceiling using the provided screws. Make sure no wiring gets pinched. From the roof, insert and securely tighten the mounting screws into the vent frame using a drill.
3. Seal and Waterproof the Edges
Once the powered roof vent assembly is mounted to the roof, it’s crucial to properly waterproof and seal around the edges. Start by applying self-leveling lap sealant to cover each screw head. The sealant will create a watertight seal around each fastener.
Next, run a thick bead of non-drying sealant around the outer perimeter of the vent base where it meets the roof. Use a product like Dicor that is specifically designed for RV roofs. Using a plastic spreader or your finger, smooth the sealant into a concave shape around the vent edges.
Taking the time to thoroughly seal and waterproof the edges of your new powered roof vent will prevent leaks and protect your RV investment.
4. Complete the Electrical Connections
After sealing the roof vent assembly, it’s time to complete the wiring to get the powered vent up and running. First, get familiar with the electrical RV components.
Connect the positive and negative wires from the vent motor to your RV’s 12V DC electrical system. Typically, there is a dedicated circuit near the existing roof vents that you can tap into. Just make sure not to overload the circuit.
With the power connected, test the operation of the vent fan speeds and dome lid. Make sure they open and close properly, and adjust the lid arms as needed. Also verify the fan is operating at the expected CFM level.
Finally, tidy up any loose wiring by bundling it together and zip-tying it up out of the way. Loose wires can get caught in the fan or lid arms, causing issues down the road.
Getting Professional Help
As you can see, installing a powered roof vent involves cutting precise openings, sealing, wiring, and working at dangerous heights. While the process may seem straightforward, this is not a project for an amateur DIYer.
We strongly recommend having a professional RV service technician install your powered vent. They have the expertise to ensure the vent is sealed completely watertight, and mounted securely. Naturally, you want to prevent any leaks or issues from improper installation.
A certified RV electrician can also safely handle the electrical wiring and hookup. And technicians have the right equipment, like boom lifts, to work on your RV roof safely.
Don’t risk thousands in damage from a botched DIY job. Our expert RV service techs at Leisure Coachworks handle powered vent installations daily. We would love to help with your RV upgrade.
Enjoy Your RV’s New Powered Vent!
Once properly installed, a powered roof vent is one of the best improvements you can make to an RV. You’ll immediately notice the improved airflow on those hot summer days. The vent will keep the interior smelling fresh and prevent damping from excess humidity.

Be sure to keep the vent screen clean and perform periodic maintenance, like resealing edges and checking wiring connections. Used properly, your powered roof vent will provide many years of reliable performance.
We hope this guide gave you some helpful pointers on choosing and installing an RV power vent. Contact us for more information about our RV upgrade services.


1 Comment
Thanks for sharing this useful blog. My friend wants to installing a powered roof vent and he is searching for guide line. So, I will share your writing with him. I hope this blog will help him. Keep posting. Good luck.