Convert Fluorescent RV Lights to Leisure LED Tube Lights
Are you looking to replace your old fluorescent tube lights with Leisure T8 LED replacement bulbs? Watch and learn how you can do this quick and easy RV upgrade. First, you’ll need to gather the necessary tools.
- Standard wire strippers
- Voltage tester
- Electrical tape
- Wire nuts
- Screw gun or screwdriver
- Leisure LED T8 replacement bulbs
- Wiring harness
Quick tip: before replacing the bulbs, turn the fixture on to make sure it works. Unless you’re replacing burned-out bulbs this is an easy way to make sure you don’t need an electrical repair before your replacement.
Removing the cover by squeezing the plastic casing reveals the existing fluorescent bulbs and the inside of the fixture. Remove the screws and the fixture. Pull the wiring down through the exposed hole.
This type of 12-volt wiring is low voltage— either take out a fuse or leave it hooked up while you work on the replacement. In almost all RV wiring, the white wire is the ground wire. The other wire, either black or colored, is hot. Disconnect the wires.
Once the fixture is free, remove the existing bulbs and the cover plate, which hides the wiring and ballast. Once that’s off the wiring that sends voltage to the fixture is visible. Disconnect the wire sending voltage from the switch to the ballast.
The next steps involve the wiring harness.
Find the wire on the harness that has a spade connector. In this case, it’s a red wire. That wire gets installed right on the connection to the switch. The other harness wire on this end, in this case black, goes back up through the roof of the fixture as the ground.
The other side of the wire harness gets laid in the best position to keep it from getting pinched. In this tutorial that position is at the end. The cover plate then gets returned to the fixture.
Once the cover plate is in place the two connections are available at one end to hook up the replacement bulbs. The new Leisure T8 LED bulbs have wires that simply plug into the wire harness ends, and then they fit right back into the fixture.
The bulbs still fit into the tabs on the fixture that used to supply power. Those tabs are now only for holding the bulb in place. The power is coming through the newly installed wire harness.
In this tutorial, there are now two black wires coming through the back of the fixture. That’s because of the wiring harness used. The wires are two different thicknesses, which is how you tell the power from the ground. The thicker wire supplies power, the thinner is the ground wire from the wire harness.
When reattaching the fixture to the RV power supply, again determine which wire coming from the ceiling is the ground and which is the power. As noted before, the ground wire in most RVs is white.
Make sure the wires are correct using a voltmeter. Touch the ground wires together and the hot wires together and the voltmeter will display a positive number.
Twist the proper wires together and cap them with wire nuts. The wiring goes back into the ceiling, the fixture is screwed in place, and the cover is replaced. Test the fixture by turning on the switch and you’re all set.
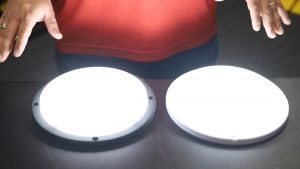
Leisure T8 LED fluorescent tube replacement lights are available in both natural white and warm white. Pick them up online from our Leisure Coachworks Parts Store to do the installation yourself. Or stop in and we’re happy to do the replacement for you.