RV Sink Upgrade Guide: How to Install a New Sink in Your RV
RVs are designed for adventure. From cross-country road trips to weekends at the lake, they take us places we love to go. But even the best journeys can hit some bumps in the road. If your RV’s kitchen sink is showing its age, an upgrade could make a world of difference.
While swapping out a sink may sound simple, this project has its challenges. Read on to learn how to install one and why you may be better off leaving major RV upgrades to the professionals.
Time for an Update? Signs You Need a New RV Sink
Like most parts of an RV, sinks take a beating. From food prep to dish duty, they handle heavy daily use. Wear and tear is inevitable over time. Here are some clues that it may be time to replace your existing sink:
- Frequent clogs and slow drainage
- Stains or odors that resist cleaning
- Rust around the drain or along sink edges
- Chips, cracks, or scratches on the surface
- Leaky faucet connections or plumbing
- Low water pressure from the faucet
- Loose mounting hardware or wobbly sink
If you’re experiencing any of these issues, a new RV sink could restore convenience to your travels.
Choosing the Right Sink for Your RV
Like any other RV accessory, shopping for a new sink means considering size, weight, and use. Before installation, decide which sink will best suit your needs. Here are some factors to consider:
RV Sink Styles
RV sinks come in three main styles:
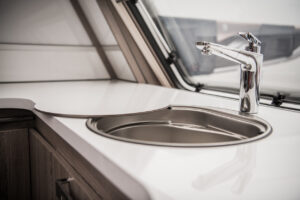
- Drop-in: The sink rests on top of the counter surface. The lip around the top edge sits around the cutout.
- Undermount: The sink attaches below the counter for a smooth and seamless look.
- Top-mount: Also called overmount, the sink rim rests on the counter with its body suspended below.
Materials
Common RV sink materials include stainless steel for durability, which is easy to clean and resistant to stains and odors. It’s a popular default option. Alternatively, ceramic is attractive and scratch-resistant but more prone to breaking. Many people also choose composite made from resins and acrylics. These sinks are lightweight but less heat tolerant.
RV Sink Size
RVs vary in size from compact campers to spacious motorhomes. In the first case, a mini-sink is appropriate, while a larger vehicle can accommodate bigger sinks with double basins. That being said, you’ll find certain dimensions are standard, but some measuring and cutting may be needed when installing an RV sink replacement. Be sure to check the dimensions of your RV sink cutout before purchasing.
Features
Finally, you may want to add bells and whistles to your RV sink to enhance its convenience and functionality. Look for added features like:
- Covers maximizing counter space when the sink isn’t in use.
- Cutting boards that double as sink covers.
- Drying racks that fold down when not needed.
- Pull-out faucets with spray functions to aid in clean-up.
- Soap dispensers for convenient access to soap.
Once you settle on the perfect sink, it’s time to prep for installation day.
Why RV Sinks Are Different than Home Sinks
At a glance, an RV kitchen sink may look similar to what you have at home. But these fixtures are specialized for life on the road. From how they mount to how they drain, RV sinks have unique requirements not found in residential settings. Familiarize yourself with the following differences:
Construction
RV sinks need to be lightweight but durable. Thin gauges of stainless steel or composite materials are common. They attach differently, too, often using brackets and clamps rather than a sealant under the counter. RV drainage systems require flexible pipes and specialized fittings. Vibration from traveling can strain connections over time.
Placement
Fitting a sink into a compact RV kitchen takes spatial problem-solving. Creating access might mean unconventional locations, and connecting plumbing requires flexibility. It’s tough to work in the cramped confines of an RV kitchen. You have to maneuver around existing fixtures and work at odd angles.
Functionality

RV sinks must operate smoothly when the vehicle is in motion. That means accessible controls, specialized drainage, and anchoring that prevents sliding and banging. These differences mean that RV sink installation isn’t always straightforward. The process requires knowledge of RV systems and the skills to work around tight spaces.
Step-By-Step RV Sink Installation
Replacing an RV sink is a multi-stage process that involves both plumbing work and carpentry skills. Here is a deeper look at each step:
Select the New Sink
Choosing the ideal sink is an important first step. Take measurements of your existing sink base and countertop cutout. Factor in your kitchen storage needs and how you utilize the space. Also, consider what size sink makes sense for the number of people traveling. This helps narrow down your options to pick the right combination of size, shape, style, and features.
Once you decide on a specific sink model, order it well in advance of installation day. Confirm it will fit your current counter cutout or make plans to modify the opening. Have any additional accessories or plumbing parts on hand so that you can complete the full installation in one session.
Removing RV Sink
With your new sink ready, it’s time to remove the old one. Start by shutting off the water supply. This may involve turning a shut-off valve or disconnecting the supply lines below the sink. Protect the valve from accidental opening while working. Also, disconnect the P-trap and any discharge tubes from the tailpiece.
Check below the countertop to see how the sink anchors. Most RV sinks use specialty mounting bars and clamps. You’ll need to remove any screws or fasteners to detach the sink from the counter. Removing the existing caulk around the rim also helps free the sink. Be prepared for some water spillage. Have towels ready to soak up any residual water in the drain.
Prepare the Countertop
With the old sink removed, take time to prepare the countertop. Thoroughly clean and sand the cutout area, removing any debris or old caulk remnants. If your new sink is a different size, carefully expand the existing hole using a jigsaw. Take precautions not to damage the surrounding countertop.
Seal any cracks, gaps, or seams around the cutout with silicone caulk appropriate for kitchen use. This waterproofs the mounting surface before attaching the new sink. Round any sharp corners of the hole for a finished look. Remove dust with a vacuum or tack cloth.
Install the New Sink
Now, you’re ready to put in the new sink according to the manufacturer’s directions. Most RV sinks come with specialized mounting hardware such as bars, screws, clips, or brackets to stabilize yet allow adjustability. Attach these firmly based on the provided instructions.
Carefully lower the sink into place, aligning any holes or hooks as needed. Confirm it sat level and centered in the cutout before finishing attachments. Avoid putting stress on the plumbing connections. Make adjustments to get proper positioning before finalizing the anchors.
Hook Up Plumbing & Accessories
With the sink base solidly installed, complete the plumbing hook-ups. Many RVs use a 12-volt water pump system, so you’ll need to connect the pump and install it according to specifications if it’s a new one.
Then, attach any supplied faucet, sprayer nozzle, soap dispenser, or other accessories. Be sure to apply thread sealant on all drainage joints for leak protection. Make water supply connections last to avoid spills.
Turn on the water and check for smooth flow and pressure. Look under the sink to verify that there are no leaks at any joints or fittings and fix any issues immediately to prevent water damage. Also, confirm adequate drainage without pooling.
Finish the Installation
The final step is permanently sealing the new sink and completing cosmetic details. Run a continuous bead of kitchen-grade caulk around the sink rim where it meets the counter. Wipe away any excess for a tidy look. Re-install any doors, baskets, or racks.
Turn on both the water supply and any sink power features. Allow the fixtures to run for several minutes and re-check for any leaks or drainage issues. Wipe down the new sink to remove installation dust, and you’re done!
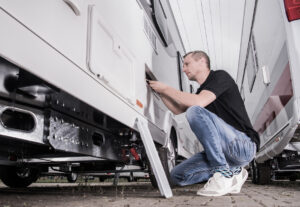
Leave it to the Experts! Why Professional Help is Your Best Bet

Special skills and tools are needed to upgrade an RV sink properly. Save yourself the hassle by calling in the professionals instead. You’ll benefit from:
- Expertise: Pro RV technicians have extensive knowledge of plumbing systems, electrical wiring, and material requirements. They use the proper methods and materials.
- Efficiency: The job takes far less time without the trial and error of DIY work. The pros minimize disruption to your RV’s function so you can get back on the road faster.
- Reliability: You’ll get a sink that works consistently, even while traveling. Professional workmanship means fewer leaks or failures. Ongoing support is available if needed.
Why spend your precious vacation time struggling with a frustrating DIY project? Our experts take RV repair off your plate so you can get back to the fun stuff!
Trust the RV Specialists at Leisure Coachworks
When you’re ready to upgrade your RV sink (or tackle any repair project), Leisure Coachworks has the skills to do the job right. Our team uses state-of-the-art techniques and equipment for precise work. We go the extra mile to meet your expectations.
RVs equip us for adventure, but it’s not always smooth sailing. A frustrating sink can make meal prep and clean-up a real chore. Don’t settle for less than fully functional fixtures. Our experts take the hassle out of RV sink installation and repair. We handle the details so you can make new memories.
Contact Leisure Coachworks to upgrade your sink and refresh your travels today!