An RV water pump leak is a serious issue that can create major headaches for you and your travel companions.
The good news is that you can troubleshoot many of the issues that cause water pump leaks yourself.
In this guide, you’ll learn how to spot a water pump leak, how to troubleshoot it, and how to prevent future leaks from happening. Find all the expert advice you need below.
Do You Have an RV Water Pump Leak?
The first step to addressing a leaky water pump is, of course, knowing that you have one in the first place. This could simply be noticing a little water on the RV floor.
If you have a leak, you will likely notice water coming from the water pump head or switch. However, you might also find that the pump keeps running even when the faucets are turned off. When this happens, this is a sign that the water pump is not able to reach the desired water pressure to shut itself off. Hopefully you will notice the pump excessively running before a leak happens.
When the water pump continues to run, the issue could be caused by a loose connection, a loose strainer cap, a cracked line, or a problem with the RV water pump pressure switch.
RV Repair: How to Troubleshoot an RV Water Pump Leak
If you’re dealing with a leaking water pump, you must take action right away. Let water continue to pool up, and you could end up facing serious water damage (not to mention you’re wasting water, which you can’t afford to do, especially when you’re camping off-grid).
The following tips can help you troubleshoot an RV water pump leak and address it as quickly as possible:
Tighten the Water Hose
Sometimes, the issue is as simple as a loose water hose. Check to see if it was not screwed on correctly the first time around. If that’s the case, tighten it. If a loose hose was the source of the problem, you know right away because the leak will stop.
Water Pump Strainer
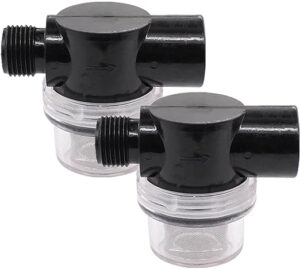
Locate the water pump by listening to where the pump sound is coming from. Usually it’s found within bench seating or in a dedicated storage on bigger rigs. Once there, look for water leaks or loose connections. A common leak is the water pump strainer has come loose and simply needs to be tightened. While you are there, it would be a good idea to inspect the strainer for debris.
Inspecting the Strainer:
- Shutoff the water – Look for a water shutoff that is attached to the water line. This is a manual shutoff that prevents water from being pulled from the fresh water tank.
- Run a faucet, forcing the pump to turn on, thereby relieving water in the line. You will see/hear the water or lack of water coming through the strainer.
- Once you are sure there is no more water in the line, turn off the water pump at the wall control switch.
- Place some rags beneath the water pump strainer and slowly twist off the strainer unit. If there is no room to twist it off, you may have to remove the cap.
- Once the strainer is removed, inspect the mesh inside the cap for debris and remove.
- Reassemble and install in reverse procedure.
Tip: Always have spare water pump strainers on board.
Check the Fittings and Hoses for Cracks and Corrosion
In many cases, a leaking water pump is the result of cracked or corroded RV parts, including the various fittings and hoses that connect to the pump.
Check each of these fittings and hoses for signs of wear and tear, and if you notice anything that seems suspect, replace it right away. These replacement parts are typically inexpensive and easy to swap out.
Replace the Pressure Switch
A damaged pressure switch can also cause a leaky water pump.
To replace the pressure switch, start by unplugging the power supply lines. Then, unscrew the screws that hold the pressure switch in place.
Next, remove the old switch and replace it with the new one, then screw it in place. From here, just replace the power supply lines.
When in Doubt, Call a Professional
If you can’t find the source of the leak, or if the recommendations mentioned above aren’t helpful, it’s time to call a professional.
Working with an RV maintenance expert is the easiest way to find the cause of your water pump leak and correct it before it has a chance to escalate and cause serious damage to your vehicle.
If you’re worried about the cost of hiring a professional, remember that it’s more expensive to do a DIY repair incorrectly and then hire an expert to fix it — it also takes more time, which means you have to wait longer before you can hit the road.
How to Prevent an RV Water Pump Leak
Nobody wants to deal with a leaking water pump. While this issue is sometimes unavoidable, there are also many steps you can take to prevent it from happening in the first place.
Keep these guidelines in mind to reduce your chances of dealing with an RV water pump leak:
Winterize Your Water Pump
Failure to winterize your water pump and the rest of your RV plumbing system properly could lead to leaks and other more serious issues. Here are some basic steps to take to protect your plumbing:
- Drain your RV’s tanks and water heater
- Open all of the faucets and low-point drain lines
- Bypass the water heater
- Connect the antifreeze to the RV’s water pump
- Pressurize and run antifreeze through the faucets
- Flush your toilet
- Pour antifreeze down the drains
Be sure to repeat this process with every faucet in your RV.
Inspect Your Pump Regularly
Regular inspections play a significant role in keeping your RV water pump (and all other parts of your RV, for that matter) functioning correctly.
Even if everything seems to be working fine, it’s still a good idea to conduct a thorough inspection every six months or so. That way, you can catch leaks and other issues while they’re still relatively small and can fix them promptly.
Schedule Regular RV Maintenance
Once a year, hire a professional to inspect your RV and perform routine maintenance.
This might seem like overkill if everything seems to be working correctly, but the key word here is seems. Just because everything seems fine doesn’t mean there isn’t a problem brewing below the surface.
Whether you need to replace a tire or make a more significant repair, an expert can let you know and offer recommendations to make the process as painless as possible.
How to Handle RV Water Damage
Ideally, you’ll catch the leak and repair it before it has a chance to cause any lasting water damage to your RV. In some cases, though, you won’t be so lucky.
If you notice signs of water damage in your RV, such as a musty smell, water stains, or warped walls, take these steps to address the problem and prevent it from getting worse:
Stop the Leak
The most important thing to do is to identify the source of and stop the leak. This can take some detective work on your part, but it’s critical if you want to avoid further damage. It also makes it easier to figure out the appropriate solution.
Open the Windows
Open the windows and turn on the fan to allow for better ventilation throughout the RV. Maximizing airflow will help you dry it out and reduce your chances of dealing with mold or mildew.
Take Pictures
Taking pictures or recording videos can help a repair professional to troubleshoot the problem sooner. This is especially true if you are dealing with an intermittent issue.
If the expert can see where the water is coming from or where you’ve noticed moisture within the RV, they’ll be better equipped to identify the source and come up with a solution.
Get Rid of Water Pump Leaks Today
RV water pump leaks are frustrating, time-consuming, and potentially expensive. The sooner you can troubleshoot them, the better.
Use the tips and suggestions mentioned in this guide as a jumping-off point to address a leaking water pump. If you’re not able to resolve the issue on your own, though, don’t hesitate to hire an expert. They will diagnose the problem and help you get back on the road right away.
Are you looking for an experienced RV repair expert? If so, our team at Leisure Coachworks is here for you. Contact us today to learn more about our RV maintenance and repair services.
